Saturday, January 4, 2014

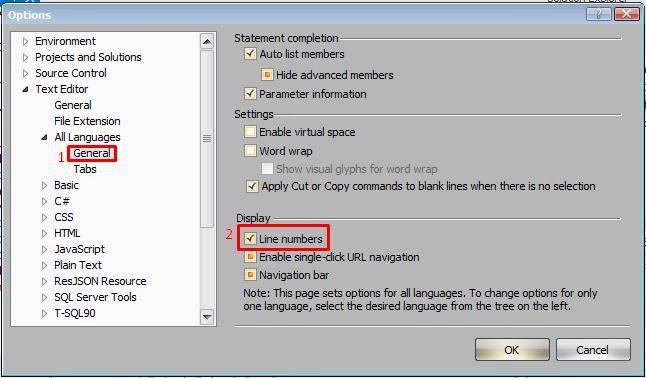
How to show line numbers in the code editor


1) Go to the menu Tools/Options...

2) When Options window pops up, Find Text Editor/All Languages/General item.
Find the Display Section and seleck Line Numbers.

ASP NET 4 BASICS USING VISUAL STUDIO 2012 Part 1


---
ASP NET 4 BASICS USING VISUAL STUDIO 2012 Part 1

PRE-REQUISITE

1) This tutorial is based on Visual Studio 2012 running on Windows 7. (http://setup-steps.blogspot.com/2014/01/visual-studio-2012-express-for-web.html )

STEPS

1) Create new Web Site.
2) New Web Site options.
1. Template Language: Visual Basic.
2. .Net Framework: 4
3. Template Types: ASP.NET Empty Web Site
4. File Location: File System
5. Path: C:\projects\vs12vb\sitevb101
3) Project creation is done.
Visual Studio automatically creates the folder structure in Step 2.5 above:
4) Look at the Solution Explorer panel.
Visual Studio 2012 automatically creates two files:
1. Web.config (created in c:\projects\vs12vb\vbsite101\) – This file keeps the setting of your web site.
2. vbsite101.sln (created in C:\Users\your-username\Documents\Visual Studio 2012\Projects\vbsite101\vbsite101.sln) – This file keeps the Visual Studio settings with regard to your web site.
5) Add a Web Form item.
It can be added from two points:
A) Solution.
B) Web site.
6) Add New Item dialog window.
1. Language: Visual Basic.
2. Type: Web Form.
3. Name: Default.aspx
4. File Type: separate code (NO), master page (NO)
Click Add.
7) Editing Default.aspx
1. In Solution Explorer panel, click the file Default.aspx
2. In the Properties Panel, the physical path to the file is shown.
3. The main panel shows the file content is Source mode.
4. The file name is displayed on top of the panel.
8) Adding item in Design mode.
1. Click Design tab.
2. Click Div element.
3. Click the div box and type “Hello World”
9) Run the web site.
Click the Run button.
Visual Studio automatically save your last editing.
10) Debugging Not Enabled dialog window.
Click OK.
11) Internet Explorer automatically loads the page on localhost address.
The port number 49175 is generated at random.
12) Switch to Visual Studio.
1. Click the Stop button to stop the web site execution from running on localhost. Alternatively, closing Internet Explorer also stops the web site execution.
2. Take note that, during run time an item “Script Documents” is added to the Solution. This item will go away when you stop the web site execution
13) Inspect the Web.config
1. Click the file Web.config in Solution Explorer panel.
2. The file content is displayed in Code Window.
Notice the debug value is true (as a result of Step 10 above)
14) Close the solution.

ADDITIONAL EXERCISE

Create the same project using C# Language using the following folder structure:
C:\projects\vs12cs\cssite101

DOWNLOAD

---

VISUAL STUDIO 2012 CREATING NEW ASP NET 4 WEB FORMS SITE USING VISUAL BASIC (VB)


---
VISUAL STUDIO 2012 CREATING NEW ASP NET 4 WEB FORMS SITE USING VISUAL BASIC (VB)

PREPARATION

Create a folder structure like C:\projects\vs12vb\WebForms1
If you haven't installed Visual Studio 2012 yet, follow this tutorial, http://setup-steps.blogspot.com/2014/01/visual-studio-2012-express-for-web.html

STEPS

1) Find the VS Express for Web Application startup link in the Start Menu.
Click the link.
2) Main application window shows up.
3) Select “New Web Site…”
4) New Web Site dialog window.
1. Select Visual Basic.
2. Select .NET Framework 4.
3. Select ASP.NET Web Forms Site
4. Select File System.
5. Type your project path e.g c:\projects\vs12vb\WebForms1\.
Click OK.
5) Project creation is done.
Notice that you get more stuff in your Solution Explorer Window.
6) Run your web site.
7) Debugging Not Enabled error dialog pops up.
Click OK.
8) The Web Browser automatically opens the localhost web page.
Notice that you get a sample working page.
9) Click the Login button.
10) Click Register.
11) Enter your desired credentials and click Register button.
12) You are now logged into the system.
Click the Home, About and Contact links above and observe the outcomes.
Click Log Off .
13) Notice the notification message below.
Follow this link to read further about it http://go.microsoft.com/fwlink/?LinkId=252803 
14) In the Solution Explorer panel, find the Database Explorer tab.
Click the Database Explorer tab.
15) Expand the objects to view the tables.
16) Right-click the table “Users” and select Show Table Data.
The Main Panel shows the record that you have just entered in Step 11.

DISCUSSION

1) The Web Forms Site template is useful for the beginners to learn on how to develop a complete web site including the user management module.
2) The user management module keeps the data in an MS SQL database which is viewable via the Database Explorer.
---

GETTING STARTED WITH VISUAL STUDIO 2012 USING VB LANGUAGE .NET 4 FRAMEWORK


---
GETTING STARTED WITH VISUAL STUDIO 2012 USING VB LANGUAGE NET FRAMEWORK
PREPARATION
Create a folder structure like C:\projects\vs12vb\site1

STEPS

1) Find the VS Express for Web Application startup link in the Start Menu.
Click the link.
2) Main application window shows up.
3) Select “New Web Site…”
4) New Web Site dialog window.
1. Select Visual Basic.
2. Select .NET Framework 4.
3. Select ASP.NET Empty Web Site
4. Select File System.
5. Browse for the folder path that you have created in PREPARATION step.
Click OK.
5) Project creation is done.
If you check the site1 folder in File Explorer, you will find a new file Web.config is created inside it.
If you view the file content using Notepad, you will see the following:
6) Notice from step 5 that what Visual Studio has done so far is just to create a configuration file in plain text format.
This actually can also be done manually by creating the configuration file (xxxx.config) and copying the following texts into it.
<?xml version="1.0"?>
<!--
  For more information on how to configure your ASP.NET application, please visit
  http://go.microsoft.com/fwlink/?LinkId=169433
  -->
<configuration>
    <system.web>
      <compilation debug="false" strict="false" explicit="true" targetFramework="4.0" />
    </system.web>
</configuration>
7) Find the Run button.
Click Run.
8) Debugging Not Enabled error dialog pops up.
Click OK.
9) Web Browser pops up with the localhost address.
You may get HTTP Error because your web site hasn’t got any default page yet.
10) In Solution Explorer Panel,
11) Add New Item dialog window.
1. Select Visual Basic.
2. Select Web Form
3. Leave the name as Default.aspx
4. Leave the two checkboxes unchecked.
Click Add.
12) Add a text “Hello World” to the Web Form.
1) In the Web Form editor window, click the Design Tab
2) Type the text “Hello World” in the <div> box.
13) Run your Web Site again.
(Visual Studio automatically saves the last editing).
14) Stop the running of the Web Site.
15) In the editor window, click the Split tab.
Now, you see both the Web Form and the HTML (Source) codes that make up the Web Form.
16) In the Solution Explorer Panel, find the file Web.Config file.
1. Select the file.
2. The Editor Window automatically shows the content of the file.
3.  The content of the file in Step 16 is almost similar to Step 5 except that the value for debug is now set to true.

ADDITIONAL EXERCISE

1) Create a new project for C# using the folder c :\projects\vs12cs\site1 and repeat the above steps.

DOWNLOAD

DISCUSSION

1) The steps to create both vb and c# is almost identical except that, in the Template Section of the New Web Site dialog window, you have to select either Visual Basic or Visual C# options.
2) As a result, the codes generated for the Default.aspx differ in the first line.
3) Refer Step 11.4, we deselect the option for “Code in separate file” and “select Master Page”.
We will discuss this further in the coming tutorials.
4) Visual Studio comes with a runtime-server for development purposes.
5) Before running our Web Site on the runtime-server, Visual Studio gives us an option to allow Debug Mode which will explicitly disclose error description during the runtime.
6) At this point, what Visual Studio did to our Web Site project  is to add two files, ie Default.aspx and Web.Config. Actually these two files can be created by any text editor program. We use Visual Studio because it provides tools to assist us to build our project easily and rapidly at later stage.
---